Flat Roof Repair

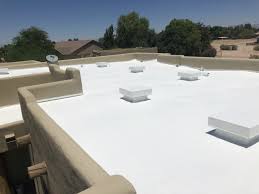
What is foam roofing?

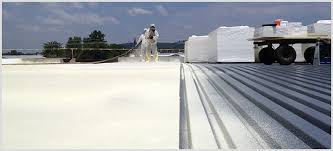
Polyurethane foam has been used as a roofing material for almost 50 years. Made from a combination of isocyanat and polyol, the foam is mixed together in a sprayer and applied to the roof surface as a liquid. The foam then begins to bubble up and expand, reaching into and sealing all the cracks and crevices in the roof. The roofing installation team will then apply a durable outer layer to protect the foam from the elements.

Foam is especially good at the following:

  • Preventing heat transfer: In the summers here in Phoenix, that means that foam does a good job insulating your home and preventing heat from getting into the living spaces of your home.
  • Preventing moisture: Because foam expands to fill up even the smallest of cracks, it’s good at preventing rain and moisture from getting to the roof it self.

Foam roof fix made easy

Once the older foam has been removed the damaged inherent deck will get visible and you must appropriate fixes and stains to it. Before applying new foam, you need to guarantee the repairs are still clean.

By obeying instruction you should re-foam the area having a high-density foam repair kit (2.5 to 4 lbs. density). Employ foam after putting on some disposable gloves and attaching the nozzle to foam container and the applicator. The applicator will vary based on the apparel. The valve can be turned on after this. As the foam will dry quickly in only a few moments you will need to work immediately. The extra foam might be wiped off using rags.

What are the benefits of foam roofing?

Here are just some of the ways in which you can benefit from installing foam roofing on your roof.

1. Lower energy bills

One of the benefits of foam roofing is that it offers superior insulation properties. The suspended aluminum particles of the foam reflect UV rays. As a result, less heating is required to keep the house warm during the winters, and less cooling is needed in the summer to keep your home cool. This effectively reduces your home energy bills.

2. Waterproofing qualities

Another benefit of installing foam is that it offers unique waterproofing qualities. Polyurethane foam is one of the best insulators. The closed cell foam is the only insulating material that doesn’t soak up water. This makes foam roofing ideal for areas that receive high rainfall every year.

At first glance, it might not seem that Phoenix fits that description. However, consider our monsoon storms, which can drop a tremendous amount of rain in a matter of minutes. One of the benefits of foam roofing is that it’s waterproof against such torrential downpours like those seen during our Arizona monsoon season.

Foam is applied as a liquid that forms into a single monolithic membrane. This material covers the entire roof, and there are no joints or seams. Water gets in from the joints and seams of the ceiling. Therefore, foam roofing makes the roof effectively leakproof.

3. Flexible installation

Foam can be applied on both existing and new roofing projects. Moreover, it can be applied on different types of roofs, including domed, pitched, flat, wood, metal, and concrete roofing. Foam can also be applied on irregular-shaped roofs. It eliminates the need of costly tear-off in case of roof replacement.

4. Maintain structural integrity

Polyurethane foam has the ability to withstand the expansion and contraction of the structure. They can remain sealed to the roof for a very long time, protecting the roof from harsh weather conditions. Foam can easily withstand high winds, sunshine, rain, and other natural elements here in central Arizona without breaking down. Finally, foam roofs are fire resistant.

5. Foam roofing directs rain to the drain

One of the benefits of foam roofing is that it allows rainwater to slope down to the drains. This is made possible by adding a little thickness in low areas. In this way, “flat roof” is actually a bit of a misnomer: there’s a slight slope that allows rainwater to come off of the roof and get into the gutters.

Cons Of Spf Roofs

Not All Contractors are Created Equally

The application of the spray foam is a process that needs to be done correctly from the beginning. The contractor needs to be precise with the application and have a solid understanding of the chemicals they are using.

It doesn’t take a large crew to install an SPF roofing system, but it requires a high degree of technical knowledge and experience.

The Spray Polyurethane Foam Alliance (SPFA) has an ISO-17024 compliant certification program that has multiple levels, requires the contractor to pass an exam and meet the criteria for a certification.

If the roofing system is installed incorrectly, it can be detrimental to the lifespan of the roof and underlying substrate.

Reasons You Should Choose Foam Roofing for Your Next New Roof

If the time is approaching for you to replace the roof commercial building, there are options for you to consider. One you might want to think about using is a sprayed foam roof. There are a number of benefits to using this type of roofing.

Quick and easy installation

A roofing job on a large commercial building using traditional roofing materials such as steel or aluminum can take several days depending on the size of the structure. However, most buildings can have a sprayed-on foam roof applied in one day. The application process also requires fewer workers and is safer than traditional roofing process, which means less likelihood of any accidents or workers going down with heat-related problems.

Energy-efficient

Spray foam roofing is among the most energy-efficient roofing processes there is. The spray foam acts as insulation, keeping the heat out and the cool in during the hot Arizona summers. Studies have shown that spray foam roofing can cut energy costs by up to 30 percent.

Long-lasting

Another benefit of spray foam roofing is that it lasts a lot longer than most conventional roofing materials, as long as you maintain it properly. With periodic reapplications, foam roofing can last 50 years or more, whereas most other roofs using other types of materials usually only last 20-30 years.

Water-resistant

Spray foam roofs are seamless and have no breaks where water can find a place to get in. Such roofs also use special sealants that make it pretty much impossible for water to penetrate the surface. With traditional roofing, water infiltration is an issue anytime there is damage or as the roof degrades over time.

Environmentally friendly

Spray foam roofing is better for the environment than other types of roofing. Many types of roofing have asphalt in them, which is a petroleum-based material. Conventional roofing also has several layers, which means there is more waste generated. Neither of those things is an issue with spray foam. Spray foam roofing also uses no chlorofluorocarbons and has a very low amount of volatile organic compounds.

Why is My Roof Leaking?

Finding a leak in your home can cause frustration and anxiety. However, there is a simple step by step process that will help you know what to do when you find a leak, how to locate it’s source, and prevent further damage.

Is My Roof Leaking?

It is important to keep in mind that if you find a sign of water damage in your ceiling or wall, it does not necessarily mean that your roof is leaking. The problem could also be the result of leaky plumbing or even condensation. If you find water damage on a ceiling that is not directly below the roof, you may want to consider these other possibilities as causing the leak.

Even if you find sign of water damage in your attic, these signs may not equate to a current leak. For example, if your house is 50 years old, it would have had two or three layers of roofing, and the leak could have occurred anywhere during the life of either roof. A water stain on the roof’s rafters is often what sets off an alarm with the building or home owner, but is far from conclusive evidence of an existing leak.

To determine if your roof is leaking, check the water damage during a rain storm or while snow is melting on your roof. If the damage shows up within 5 hours of recent rain or snow activity, it is probably the result of a roof leak. If the damage occurs outside of this 5 hour range, you may want to have the area checked by a plumber.

With any leak, water can build up and put a heavy amount of weight on your ceiling. If you see a bulge in the sheet rock or paint of the affected area, you will want to drain the water to prevent the sheet rock from collapsing and causing more damage to your home. Simply put a bucket under the affected area and poke a hole in the sheet rock with a 16 penny nail to drain the water.

Finding Roof Leaks

Roof leaks are a potentially serious headache as they can structurally damage your roof and other parts of your home. As your roof ages it becomes particularly important to look for signs of leaks so that you can prevent problems before they arise. Some areas are prone to leaks so prevention efforts should be focused on these areas. Nevertheless, the effects of stormy weather can weaken roofing materials and make leaks possible almost anywhere on your roof. So, what is the best way to approach finding leaks?

Roof Penetrations

Roof leaks are most common around flashing, sealants, and fixtures such as chimneys and skylights. To this end, you should search for leaks wherever there are penetrations through the roof membrane. With regards to single-ply roofing systems, flashings are made from the same material as the membrane, so you’ll want to look at flaps, seams and sealants in these locations.

Roof drains may also penetrate the roof membrane. Because drains carry excess water away from the roof, they can be a high risk area for leaks. After all, rain that falls on the roof will flow over the drains’ seals. These drains should be inspected for leaks, but they also need to be cleaned regularly to prevent water buildup.

Perimeter Leaks

Roof leaks along the edges of your roof are common because of changes in roofing materials from flexible flashings to metal flashings. The right materials and proper installation can be critical in preventing leaks, but the potential still exists. Similarly, leaks are common near expansion joints on the edges of your roof. Wherever expansion and contraction of construction materials is likely, roof leaks are common so these areas should also be inspected carefully.

Condensation

Homeowners are sometimes surprised to discover leaks in the least likely seasons. Even in the middle of winter when temperatures are regularly below zero, condensation may form as warm interior air meets cold air or the cold surfaces of your roof. Eventually, as condensation builds up, leaks begin to form. As such, it is important to ensure proper installation and inspection of the vapour barriers between ceilings and walls and the roof.

Tips for Finding a Leak

Once a leak has formed, finding it requires some solid problem solving skills. You can try doing a water test on a dry day to determine the source of a leak. You’ll need one person on the roof with a hose and another inside looking for the leak. Start from the bottom of the roof, spraying water on the roof and progressively moving up the roof until the leak is identified. This process can be very time consuming as you’ll need to give the water time to travel from the roof to the point of the leak. This means you should spray one area of the roof and wait for up to 2 hours to see if water ingress begins.

You can also inspect your roof for signs of damage, which is where leaks will usually originate. Inspections of your attic may also prove useful. Ultimately, finding the source of a leak can be challenging and time consuming. You should consider hiring a roofing professional to find and fix your roof leaks.

How To Fix a Roof Leak

Roof leaks should be fixed immediately since it can seriously damage your home in a minimum amount of time. Keep your eyes open for any water stains and mold since it is the first signs of damage to your roof. Take the necessary precautions to limit the damage until you can inspect it from outside and repair it.

Materials Needed In Fixing A Roof Leak

The materials needed are binoculars, flashing cement, bucket and string, extension ladder, putty knife, tape measure, roof ladder, flashlight, screw driver or drill with different bits.

Finding The Leak Inside Of Your Home

The first place that you should check is the area above where the leak is coming from. Check the floor of the attic with the help of a flashlight and look for any H20 stains, water pools or damage insulation. Check the lower portion of the roof of your home for any wetness or molds especially around the vents. These usually indicate damage in the flashing portion of the roof.

A leak from such areas also shows damage in the material of the roof. Do not forget that H20 may pass sideways before leaking through the sheathing of the roof. Take some measurements from the inside points that you can also found outside. Begin from the middle of a sidewall or ridge. If the ceiling of your home is connected to the rafters of your roof, the only thing that you can do from inside your home is to get the measurements that will aid you to find the damage outside your residence and try to limit the problem internally.

Controlling The Leak

H2O can easily traverse the bottom portion of the rafter before leaking in a single or more area inside your home. To direct the water where it leaks, place a string into the stream and let it fall into a container. The H2O leak tends to follow the piece of string. Create a hole in the ceiling to let the excess water fall through easily. This method will also prevent the ceiling from rotting because of over saturation.

Finding The Leak From Outside Of Your Home

With the measurements that you have gathered from inside your residence, make an initial assessment of the condition of the roof by using binoculars and a roof ladder. Avoid going up the roof when it is raining since it becomes slippery and dangerous. Look for any fallen leaves and other materials that affect the flow of H2O. If your roof is filled with snow, there might be a dam at the lower portion of the roof which causes the H20 to penetrate the roofing. Take it out carefully. If you can safely examine its location, look for any damage to the roof material or holes that the water can pass through.

Use metal flashings to fix the hole or you can change the gaskets of the vents. You also have to examine the portions of your roof that are previous damages that have been fixed with flashing cement if they have been damaged again. If there are any damages, reapply flashing cement with help of the putty knife. You also have to check the connections of the antenna, cable dish or any other items in your roof. Use roof flashing to secure the screws of each item. If the leak is coming from the middle of the roof and not the flashing, check for damaged shingles. On roofs made out of wood, check for cracked shingles. You can also check the joints to see if they are the source of the leak. Flat roofs usually need a closer examination to locate damaged portions.

Additional Tips

Avoid walking on a roof that has a high temperature or very old since it is more susceptible to damage. Use a roof ladder when checking your roof. For additional safety, place catwalks over the roof frames. This will also help protect the drywall of your roof ceiling.